
What to know
- Drafts around windows and exterior doors usually result from uncontrolled air leakage through gaps in or around the assembly.
- A simple paper test, visual inspection or light test can help homeowners locate some window and door air leaks.
- Weatherstripping is generally used around movable components, while caulk is appropriate for many stationary cracks and joints.
- Gaps between a window or door frame and the rough opening can also leak air and may require appropriate caulk, backer rod or low-expansion foam designed for windows and doors.
- A draft does not automatically mean a window or door needs replacement; sealing, adjustment or repair may solve the problem.
- Windows and doors are not necessarily the largest sources of air leakage in a home, so persistent whole-home drafts may justify a broader energy assessment.
Feeling cold air around a closed window or exterior door does not necessarily mean you need to replace it.
Drafts usually indicate that outdoor air is finding a path through gaps in the window or door, around movable components, between the frame and surrounding construction, or through nearby parts of the building envelope.
Some of these leaks are relatively simple to identify and seal. Others point to worn components, installation problems, or deterioration that deserves professional attention.
The first step is finding out where the air is actually coming from.
What Causes Drafty Windows and Doors?
Windows and exterior doors interrupt the walls of your home.
They contain frames, joints, movable parts, seals, and connections to the surrounding structure. Each of those locations can potentially allow air to pass through if it is not properly sealed.
Common causes include:
- Worn or missing weatherstripping
- Cracked or deteriorated caulk
- Gaps around window or door trim
- Poorly sealed rough openings
- Windows that do not close or latch tightly
- Doors that no longer fit their frames correctly
- Worn door sweeps or thresholds
- Deteriorated frames, sashes, or other components
- Installation problems
The sensation of a draft can also sometimes be caused or intensified by a very cold window surface rather than a large physical air leak.
That is why it helps to locate the actual leak before deciding what to repair.
Start With a Visual Inspection
Inspect the window or door from inside the home.
Look for:
- Visible gaps
- Cracked or missing caulk
- Damaged weatherstripping
- Light visible around a closed door
- Loose trim
- Deteriorated wood
- A door that does not close evenly
- A window sash that does not seat properly
- Peeling paint or other evidence of repeated moisture
Open and close the window or door as well.
It should operate normally and close securely.
For windows, engage the locks or latches as they would normally be used. Properly closing and locking a window can help pull components together and reduce air leakage.
If the unit cannot close correctly, adding sealant around it may not address the actual problem.
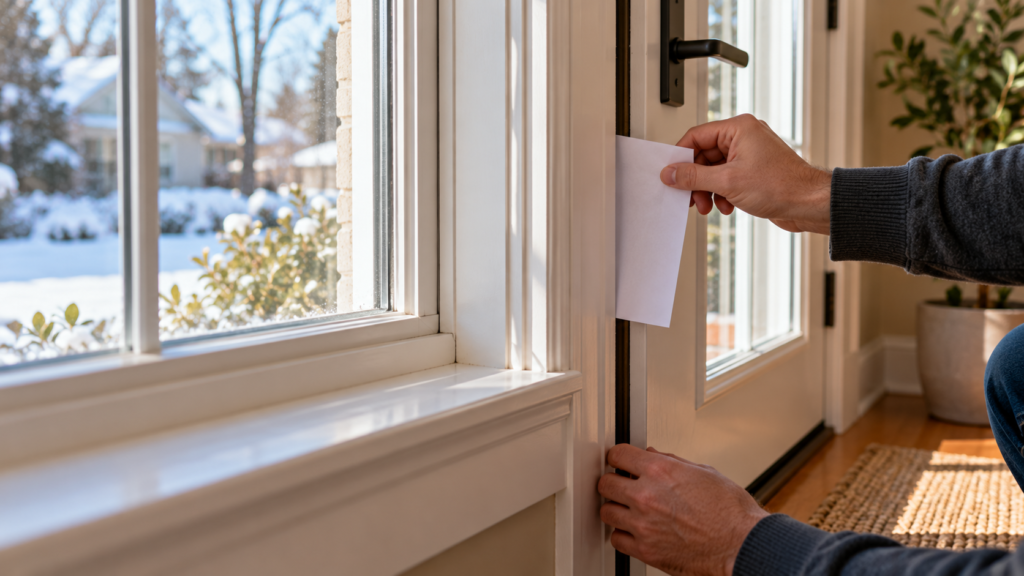
Try the Paper Test
One of the simplest ways to check a window or door is the paper test.
ENERGY STAR and the U.S. Department of Energy describe this basic DIY method.
Place a piece of paper between the window or door and its frame, then close it.
Try to pull the paper out.
If the paper slides out very easily, the seal at that location may not be tight enough.
Repeat the test at several points around the perimeter because one section can seal differently from another.
The test does not measure the exact amount of air leakage, but it can help identify areas that deserve closer inspection.
Look for Light Through Gaps
Another simple method is a light test.
At night, shine a flashlight along suspected gaps while another person observes from the opposite side.
If light is clearly visible through an area that should be sealed, you have found an opening.
ENERGY STAR specifically recommends checking the edges of windows and doors for light where they should be sealed shut.
This method is better at finding obvious openings than very small leaks.
What About Using Smoke to Find a Draft?
DOE and ENERGY STAR materials also describe using smoke from incense or a smoke-testing device to identify air movement around suspected leaks.
Moving smoke can reveal airflow that is difficult to see.
However, avoid using an open flame around curtains, combustible materials, or other unsafe locations.
A professional energy assessment can provide a much more systematic evaluation when the source of leakage is difficult to identify.
Weatherstripping or Caulk?
These materials solve different types of problems.
Weatherstripping
Weatherstripping is generally used where components need to move, such as around an operable window sash or exterior door.
It creates a seal when the component is closed while still allowing it to open.
Weatherstripping can deteriorate, compress, detach, or become ineffective over time.
If existing weatherstripping is damaged, replacement may improve the seal.
Choose a product appropriate for the particular window or door and install it according to the manufacturer’s instructions.
Do not add so much material that the window or door can no longer close or latch correctly.
Caulk
Caulk is generally appropriate for stationary cracks and joints that should not move during normal operation.
Potential locations can include gaps between fixed trim and surrounding surfaces.
Old caulk that is cracked, separated, or missing may no longer provide an effective air seal.
The correct sealant depends on the materials, location, joint size, exposure, and manufacturer requirements.
Do not caulk over drainage openings or other intentional parts of a window or door system.
The Leak May Be Behind the Trim
Sometimes the window or door itself closes correctly, but air still enters around the perimeter of the frame.
The gap between the window or door unit and the framed rough opening in the wall can be an important air-leakage path.
DOE building-science guidance recommends sealing these gaps with appropriate materials such as caulk, foam backer rod, or canned spray foam depending on the size and configuration of the gap.
When foam is used around windows and doors, it should be low-expansion foam specifically intended for window and door applications.
Excessive expansion can distort frames and interfere with normal operation.
Accessing these gaps may require removing interior trim. If you are not comfortable removing and reinstalling trim without damaging the assembly, this is a reasonable point to use a professional.
Do Not Rely on Fiberglass Insulation to Stop Air
A gap around a window may already contain fiberglass or another fibrous insulation.
That does not necessarily mean it is air sealed.
DOE guidance specifically notes that fibrous insulation alone should not be relied upon to block airflow around window and door rough openings.
Insulation and air sealing perform different jobs.
Insulation slows heat transfer.
An air barrier stops uncontrolled air movement.
A high-quality installation needs to address both.
Check the Bottom of Exterior Doors
The bottom of an exterior door deserves separate attention.
Look at:
- The door sweep
- Threshold
- Weatherstripping
- Alignment between the door and threshold
If you can see daylight under a closed exterior door or clearly feel outside air entering there, the bottom seal may need adjustment or replacement.
But the door still needs to operate safely and close correctly.
Do not create so much resistance that the door becomes difficult to open, close, or latch.
Is the Draft Really Coming From the Window?
This is an important question.
ENERGY STAR points out that homeowners commonly notice drafts around windows and doors, but the most significant air leaks in many homes are actually hidden in places such as the attic and basement.
Air movement through a house can make leakage at lower levels more noticeable.
That means sealing a few windows may improve local comfort without solving the home’s larger air-leakage problem.
If the entire house feels drafty, heating and cooling costs are unusually high, or you cannot identify the source of the problem, consider a broader home energy assessment.
When Is a Professional Energy Assessment Useful?
A professional home energy assessment can evaluate the building as a system rather than inspecting one window at a time.
A common diagnostic tool is a blower door, which uses a calibrated fan to create a controlled pressure difference between indoors and outdoors.
This makes air leakage easier to identify and can help quantify the home’s overall airtightness.
A professional assessment can be particularly useful when:
- Drafts occur throughout the house
- The source is difficult to locate
- You are planning a larger insulation or air-sealing project
- Heating or cooling costs appear unusually high
- Comfort problems persist after obvious leaks are sealed
It can help prevent spending money on window replacement when larger leaks exist elsewhere.
Does a Draft Mean You Need New Windows?
No.
A draft by itself is not enough to conclude that a window should be replaced.
If the window is structurally sound and operates correctly, air leakage may sometimes be improved with:
- New weatherstripping
- Appropriate caulking
- Better sealing around the frame
- Adjustment or repair
- Proper locking and operation
Replacement becomes more reasonable to investigate when there are broader problems such as:
- Severely deteriorated frames or sashes
- Windows that no longer operate correctly
- Significant water intrusion
- Failed components that cannot be reasonably repaired
- Persistent leakage caused by the unit itself
- Poor overall performance combined with other reasons to upgrade
The same principle applies to exterior doors.
Diagnose first. Replace when the condition of the assembly actually justifies it.
Air Leaks and Water Leaks Are Not the Same Thing
A draft indicates air movement.
Water entering around a window or door during rain is a different building-envelope problem.
Window and door openings also need properly integrated flashing and drainage to direct water away from the wall assembly.
If you see:
- Water entering during rain
- Wet drywall
- Staining around the frame
- Soft or deteriorated wood
- Repeated moisture damage
do not assume that interior caulk is the correct repair.
Water intrusion can involve flashing, exterior cladding, installation details, or other parts of the drainage system and may require professional investigation.
A Simple Draft-Checking Order
If a window or exterior door feels drafty, work through the problem systematically.
1. Close and lock it properly
Make sure the unit is fully closed and operating as intended.
2. Inspect it visually
Look for gaps, damaged seals, cracked caulk, deterioration, and alignment problems.
3. Perform a paper test
Check several points around the window or door.
4. Check for visible light
Look for obvious openings around closed components.
5. Inspect weatherstripping
Replace deteriorated material with an appropriate product if needed.
6. Inspect stationary joints
Determine whether failed caulk or another stationary seal is contributing to the leak.
7. Consider the rough opening
If air appears to enter between the frame and wall, sealing behind the trim may be needed.
8. Look beyond the window or door
If drafts affect much of the home, investigate the broader building envelope rather than assuming every problem comes from the windows.
When Should You Call a Professional?
Professional help is reasonable when:
- The window or door is significantly misaligned.
- Frames or sashes are deteriorated.
- There is evidence of water intrusion.
- You suspect installation or flashing problems.
- Air is leaking behind trim that you cannot safely remove.
- Multiple windows or doors have substantial problems.
- Drafts persist despite basic sealing.
- You want a blower-door test or comprehensive energy assessment.
- Replacement is being considered and you want to establish whether it is actually necessary.
The Bottom Line
Drafty windows and doors are usually a problem of uncontrolled air movement, but the leak may be in the weatherstripping, a stationary joint, around the frame, or elsewhere in the home’s envelope.
Start by locating the leak.
Check that the window or door closes correctly, inspect the seals, use a simple paper or light test, and distinguish movable joints from stationary gaps.
Weatherstripping and caulk can solve many localized problems when used in the right places. More complex gaps around rough openings may require low-expansion window-and-door foam or other appropriate air-sealing materials.
Most importantly, do not assume that feeling a draft means you need new windows.
Find the path the air is taking first. Then choose the repair that addresses that path.
Sources and references
- U.S. Department of Energy — Consumer Guide to Air Sealing the Home
- U.S. Department of Energy — Consumer Guide to Home Energy Assessments
- ENERGY STAR — Locating Air Leaks
- ENERGY STAR — Sealing Behind Window & Door Trim Project
- ENERGY STAR — Residential Windows, Doors, & Skylights
How we research
Habita2 prioritizes authoritative U.S. government agencies, technical standards and primary documentation. We translate that information into practical homeowner guidance and distinguish general information from situations that require qualified professional assessment.
Learn how Habita2 researches its guides →